Tennis court line detector: Part 4, generate validation and test data


Add more tennis courts
I created a brand new Unity project, added this tennis court, and went through the same steps as described in Part 1 to add the keypoints. This was tedious, I wish I could find a better way!
To avoid confusing the network, I "grayed out" the other court in the scene by adding a plane on top of it.

Create a training/validation split
Let's update the dataset to be able to merge multiple folders generated by unity perception:
class TennisCourtDataset(torch.utils.data.Dataset):

    def __init__(self, data_paths: List[str], transform=None):

        self.solo_frames = []

        # Preload all frames to allow for random access
        for data_path in data_paths:
            solo = Solo(data_path=data_path)
            for frame in solo.frames():
                self.solo_frames.append((frame, data_path))
Now when invoking the CLI, pass in a single directory which contains multiple solo_<id> directories, and it will combine them then split them into training and validation subsets:
    train_solo_dirs = [os.path.join(train_val_data_path, d) for d in os.listdir(train_val_data_path) if d.startswith("solo_")]

    dataset = TennisCourtDataset(data_paths=train_solo_dirs)

    train_dataset, val_dataset = train_test_split(dataset, test_size=0.2, random_state=42)

    # Create the train and validation dataloaders
    train_loader = utils.data.DataLoader(
        train_dataset,
        batch_size=32,
        shuffle=True
    )
    val_loader = utils.data.DataLoader(
        val_dataset,
        batch_size=32
    )
Visualize predictions on validation sets
Let's add a pytorch lightning callback for the validation_step and then call the visualization code
    def validation_step(self, batch, batch_idx):

        print("validation_step batch index: ", batch_idx)

        x, img_non_normalized, keypoints_xy_gt, kp_states_gt = batch

        loss, (keypoints_xy_pred, kp_states_pred) = self.calculate_loss(x, keypoints_xy_gt, kp_states_gt)

        self.log('val_loss', loss, prog_bar=True)

        # Log a random image of the first batch of each epoch
        if batch_idx == 0:

            self.superimpose_keypoints(
                img_non_normalized,
                kp_states_pred,
                kp_states_gt,
                keypoints_xy_gt,
                keypoints_xy_pred,
                log_prefix="val_images_epoch"
            )
A few notes:
- This visualizes the non-normalized images, because the normalized images are pretty ugly.
- To get a larger variety of samples, I added
shuffle=Trueto the validation data loader
Retrain
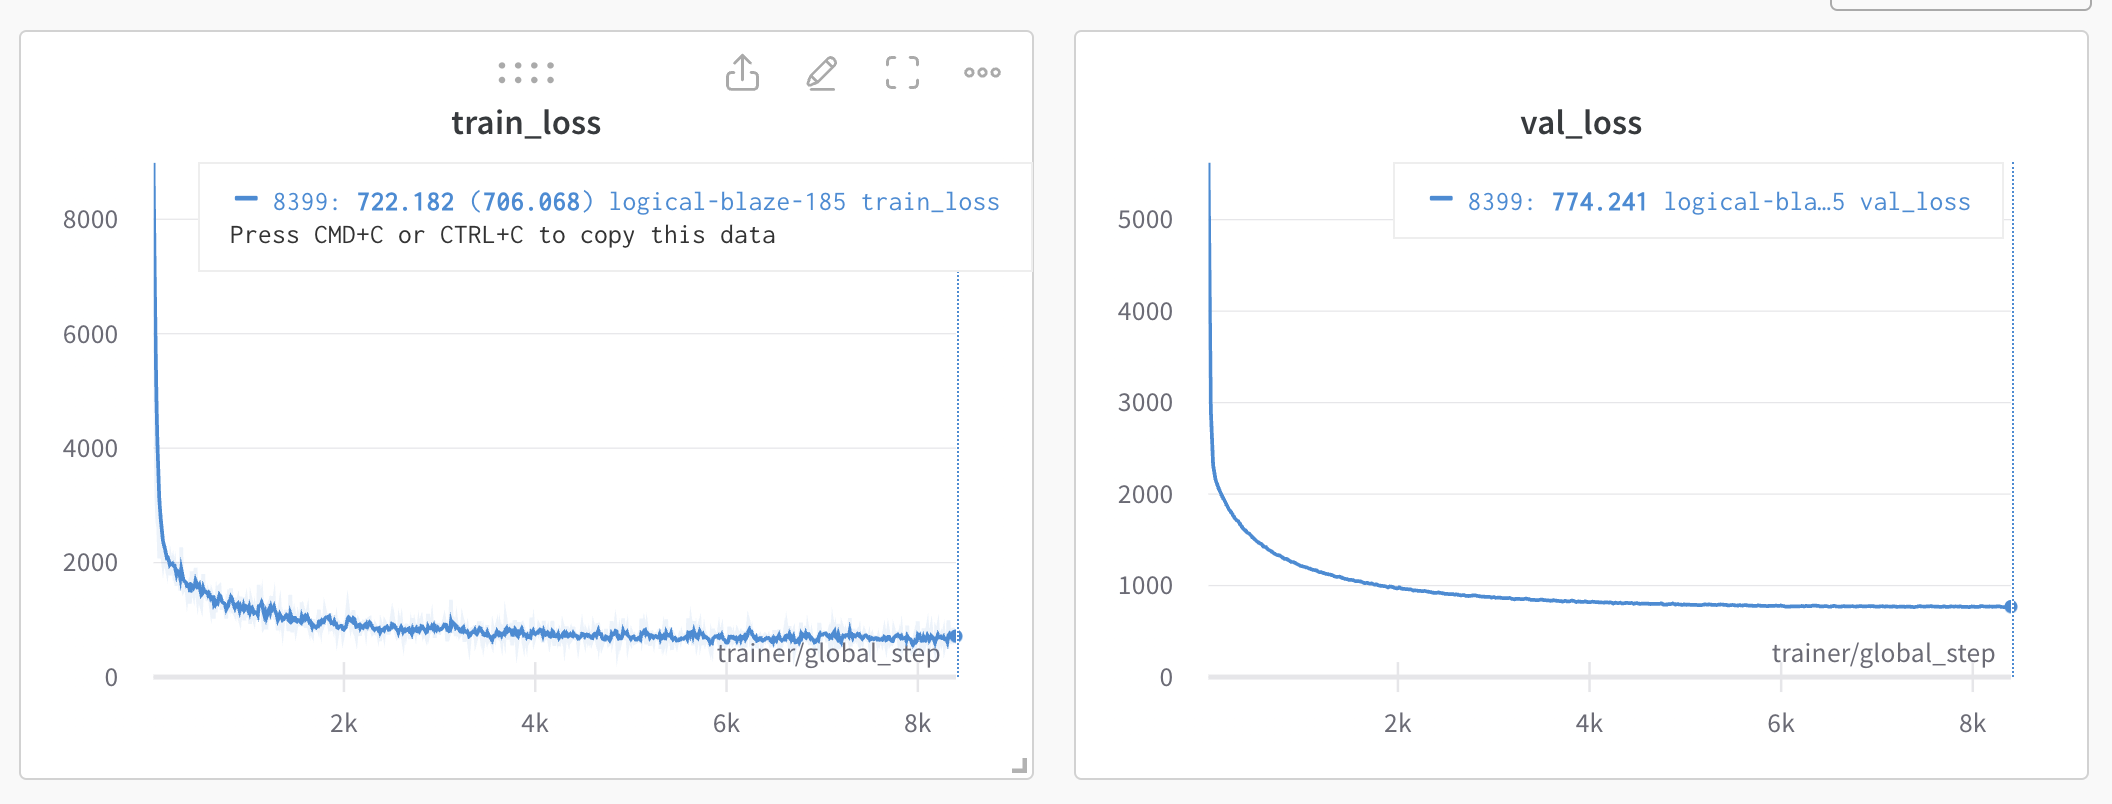
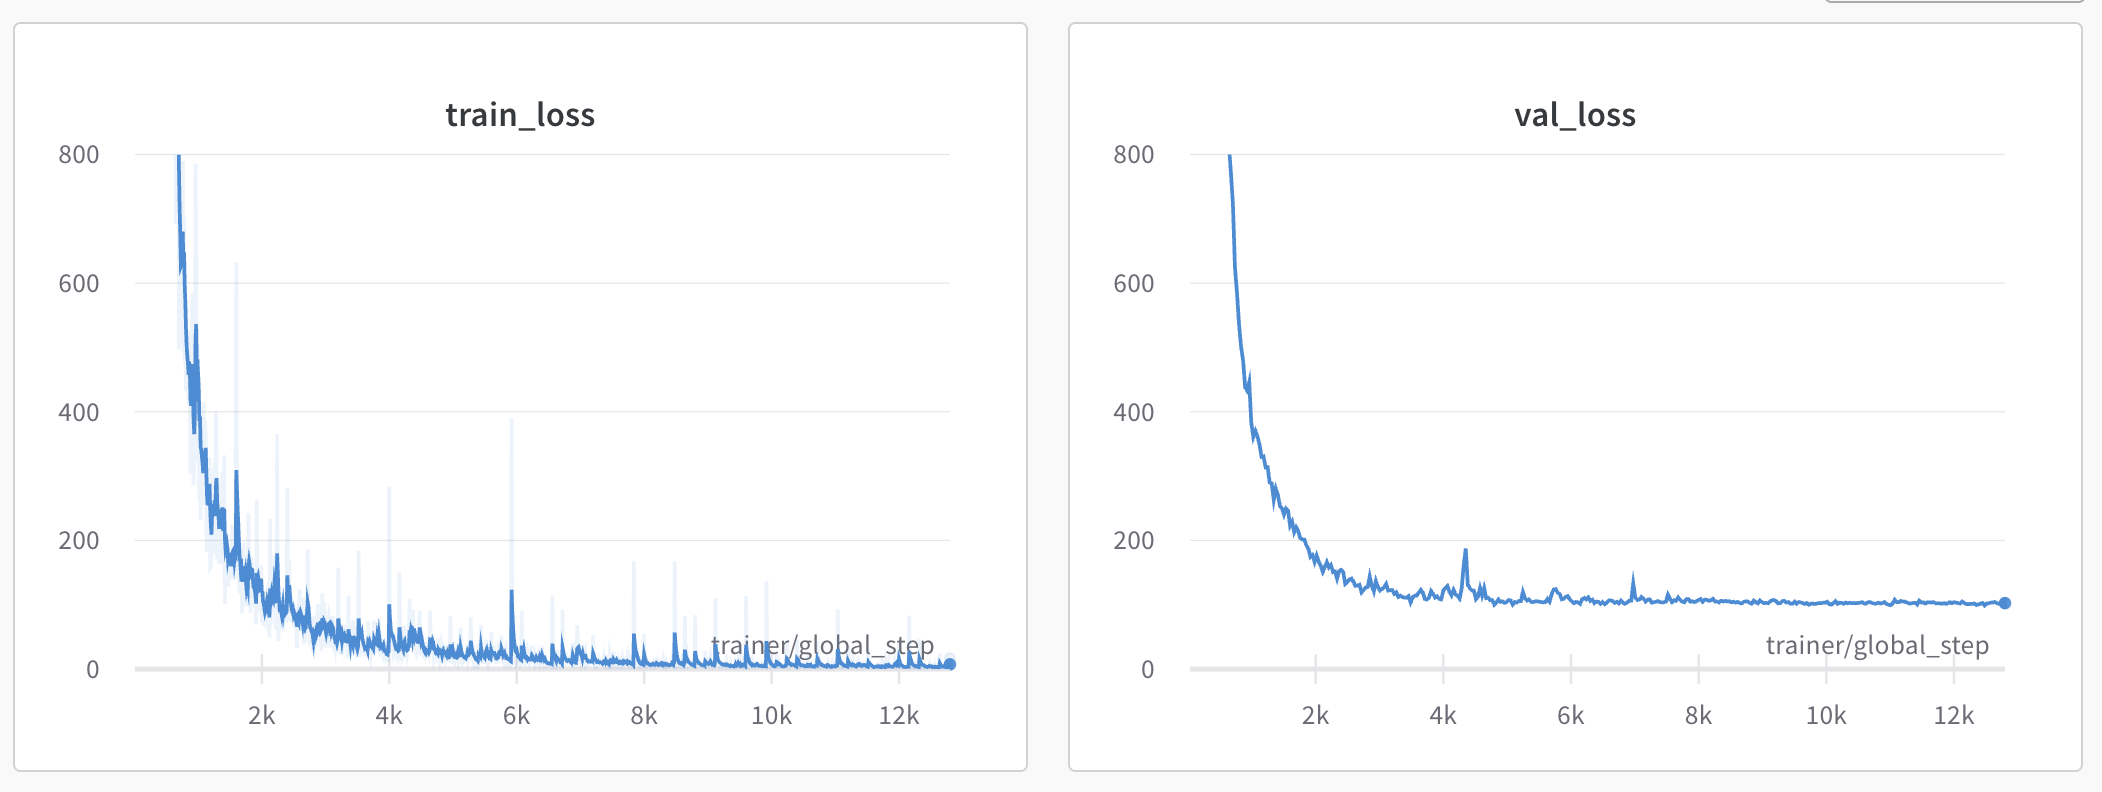
Unfortunately (but not surprisingly) the network is overfitting:
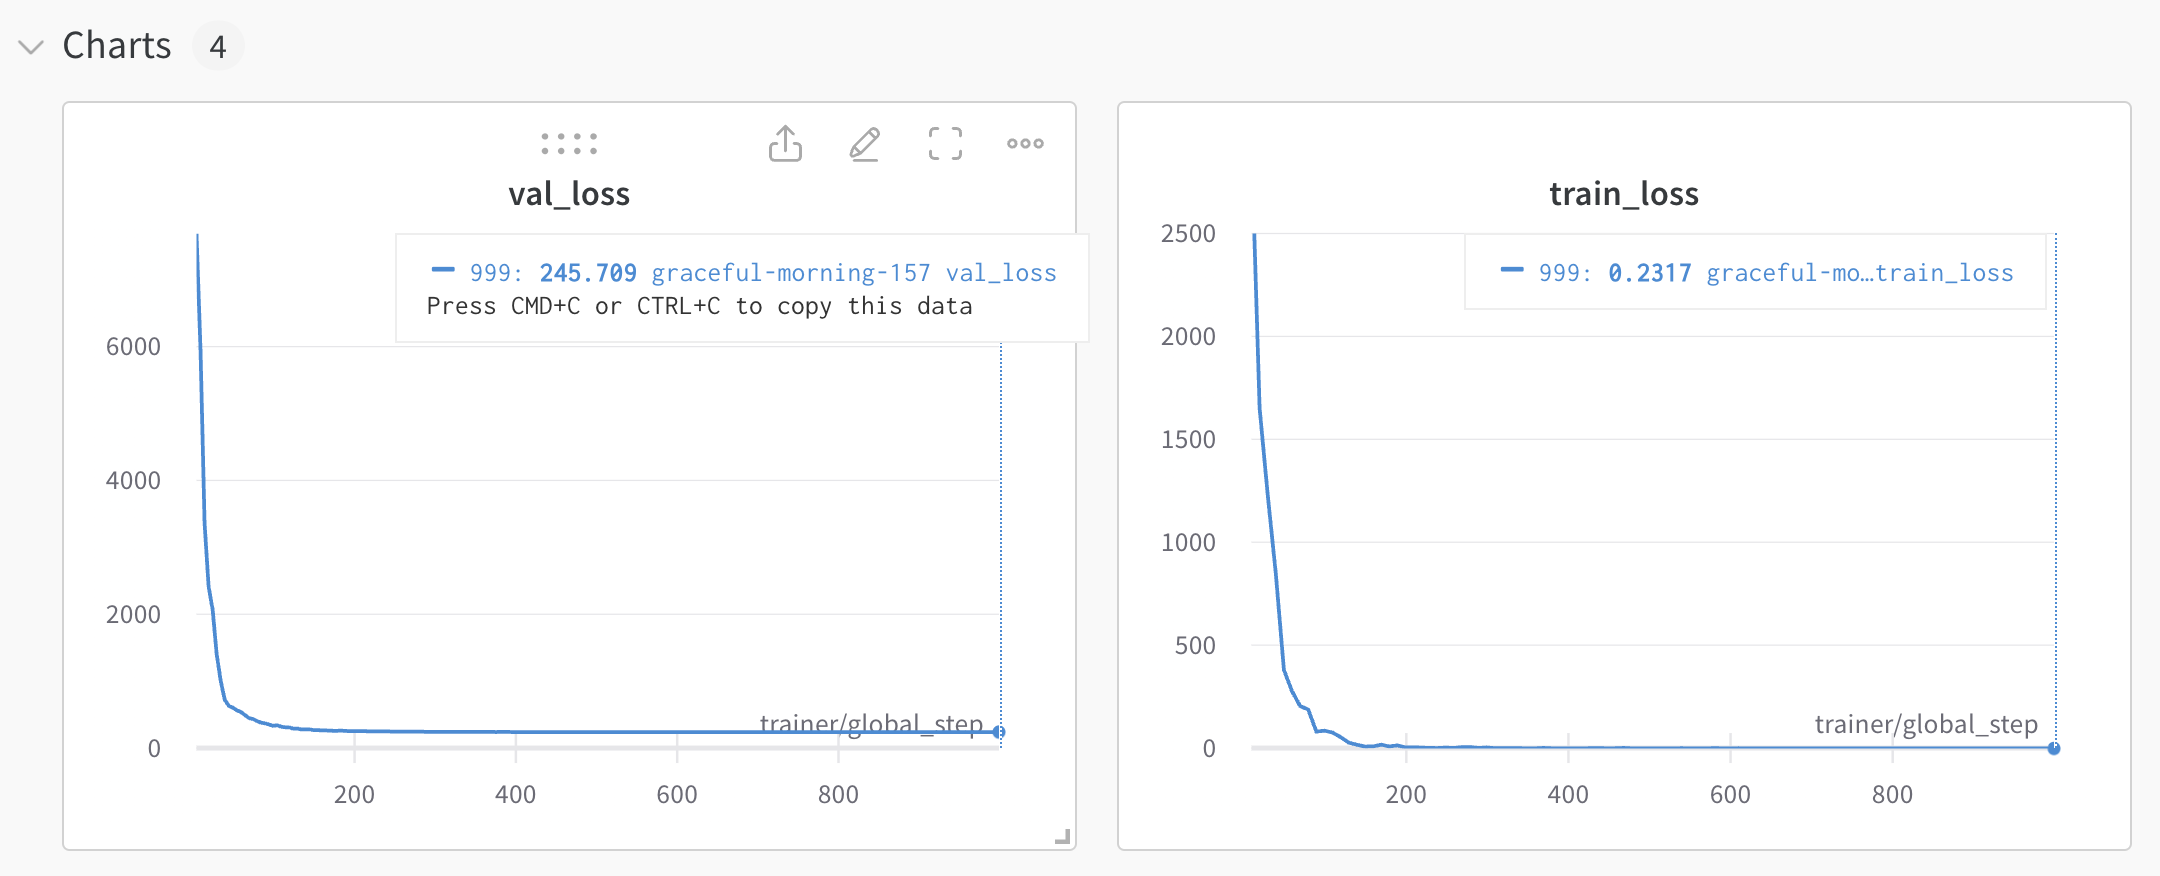
The validation loss hits a bottom fairly early on, but the training loss keeps going down.
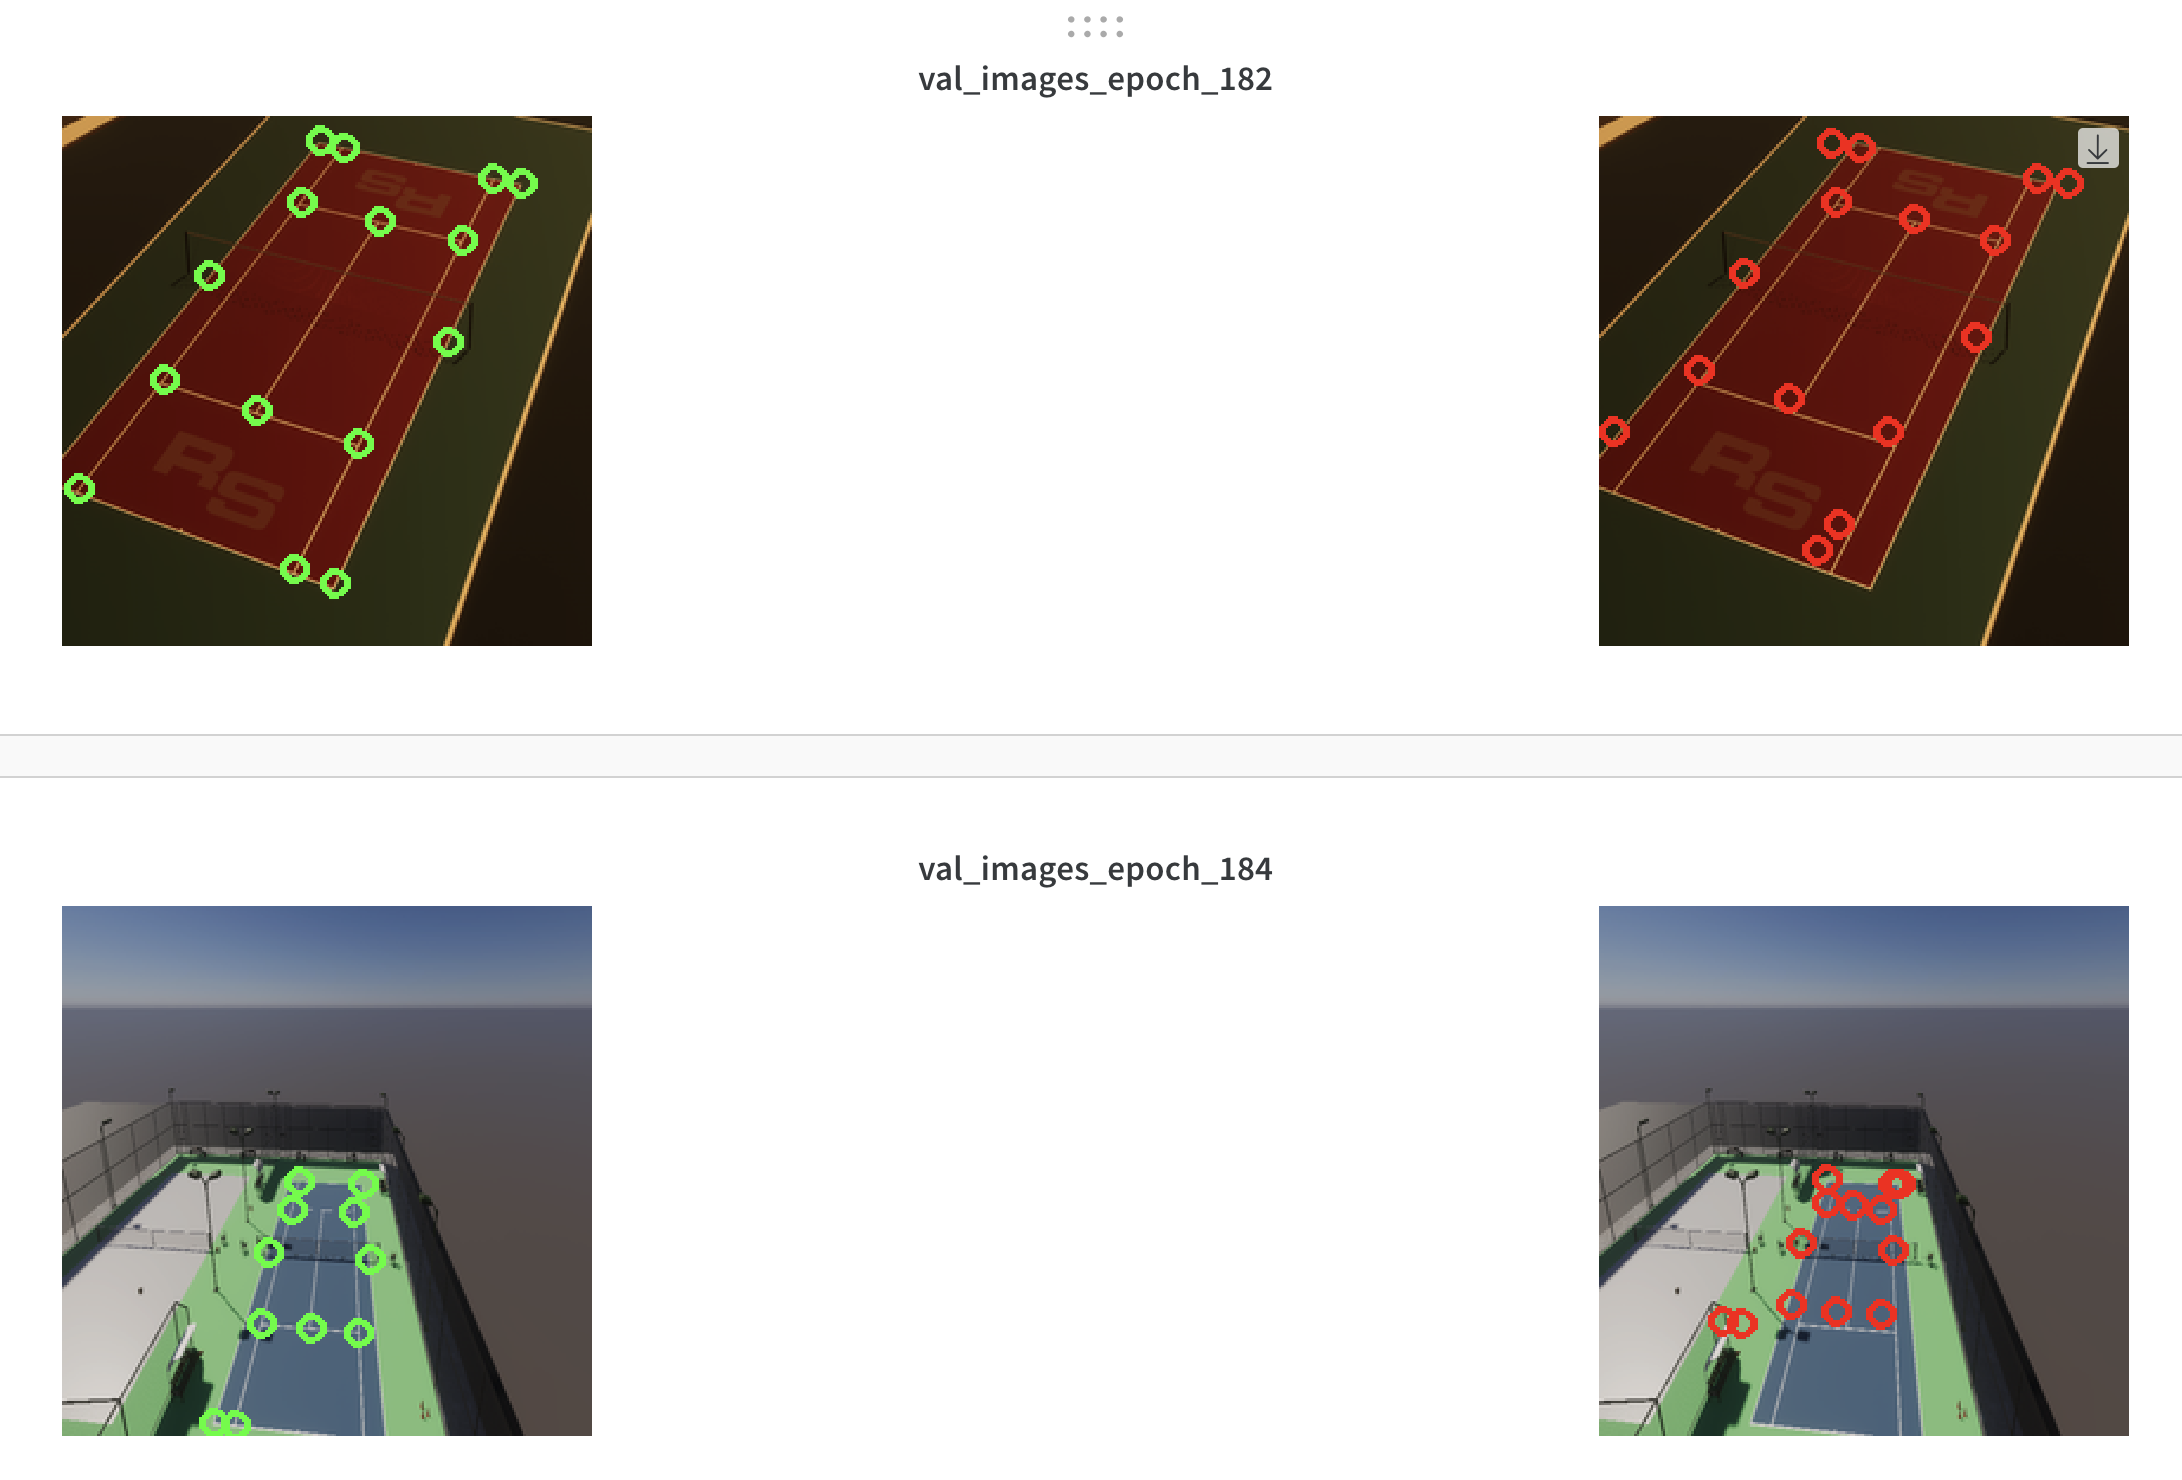
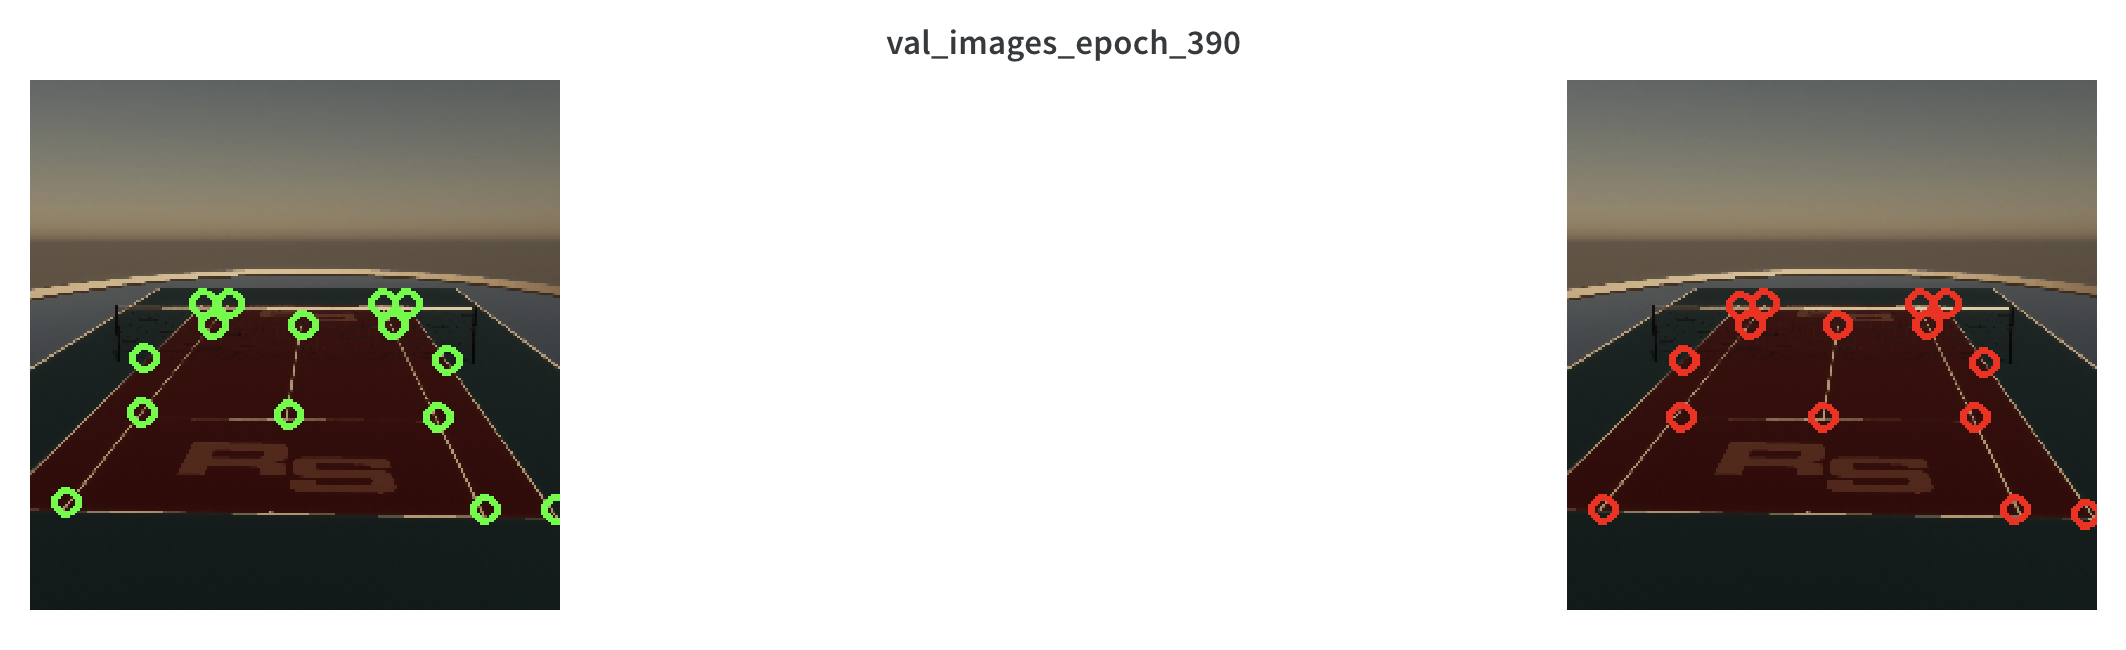
Here are some examples of predictions on the validation set:
Regularization #1 - add more data
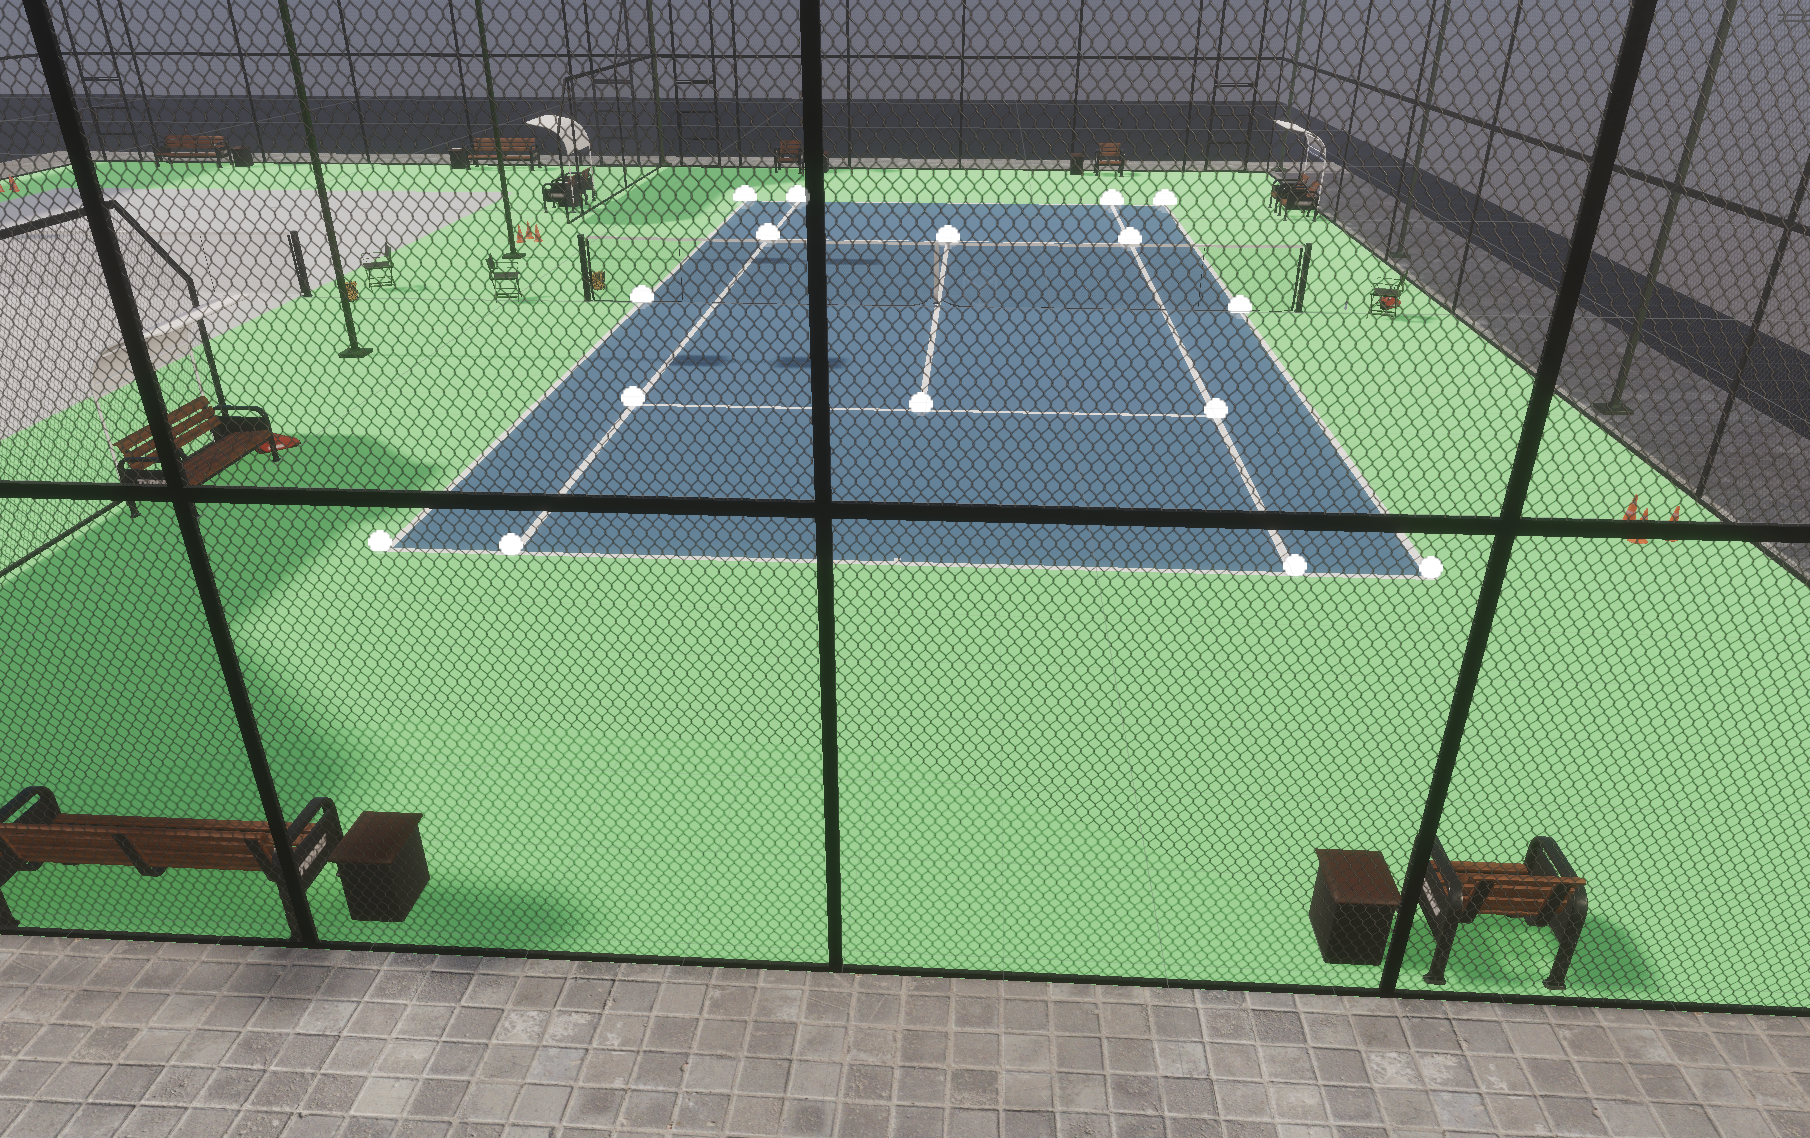
Using the same two courts, I generated data from different camera heights for both courts, using the same randomization settings as before (rotation and lighting)
Not that there is now some noise being added, in the form of the fence blocking the court. This should have an additional regularization effect.
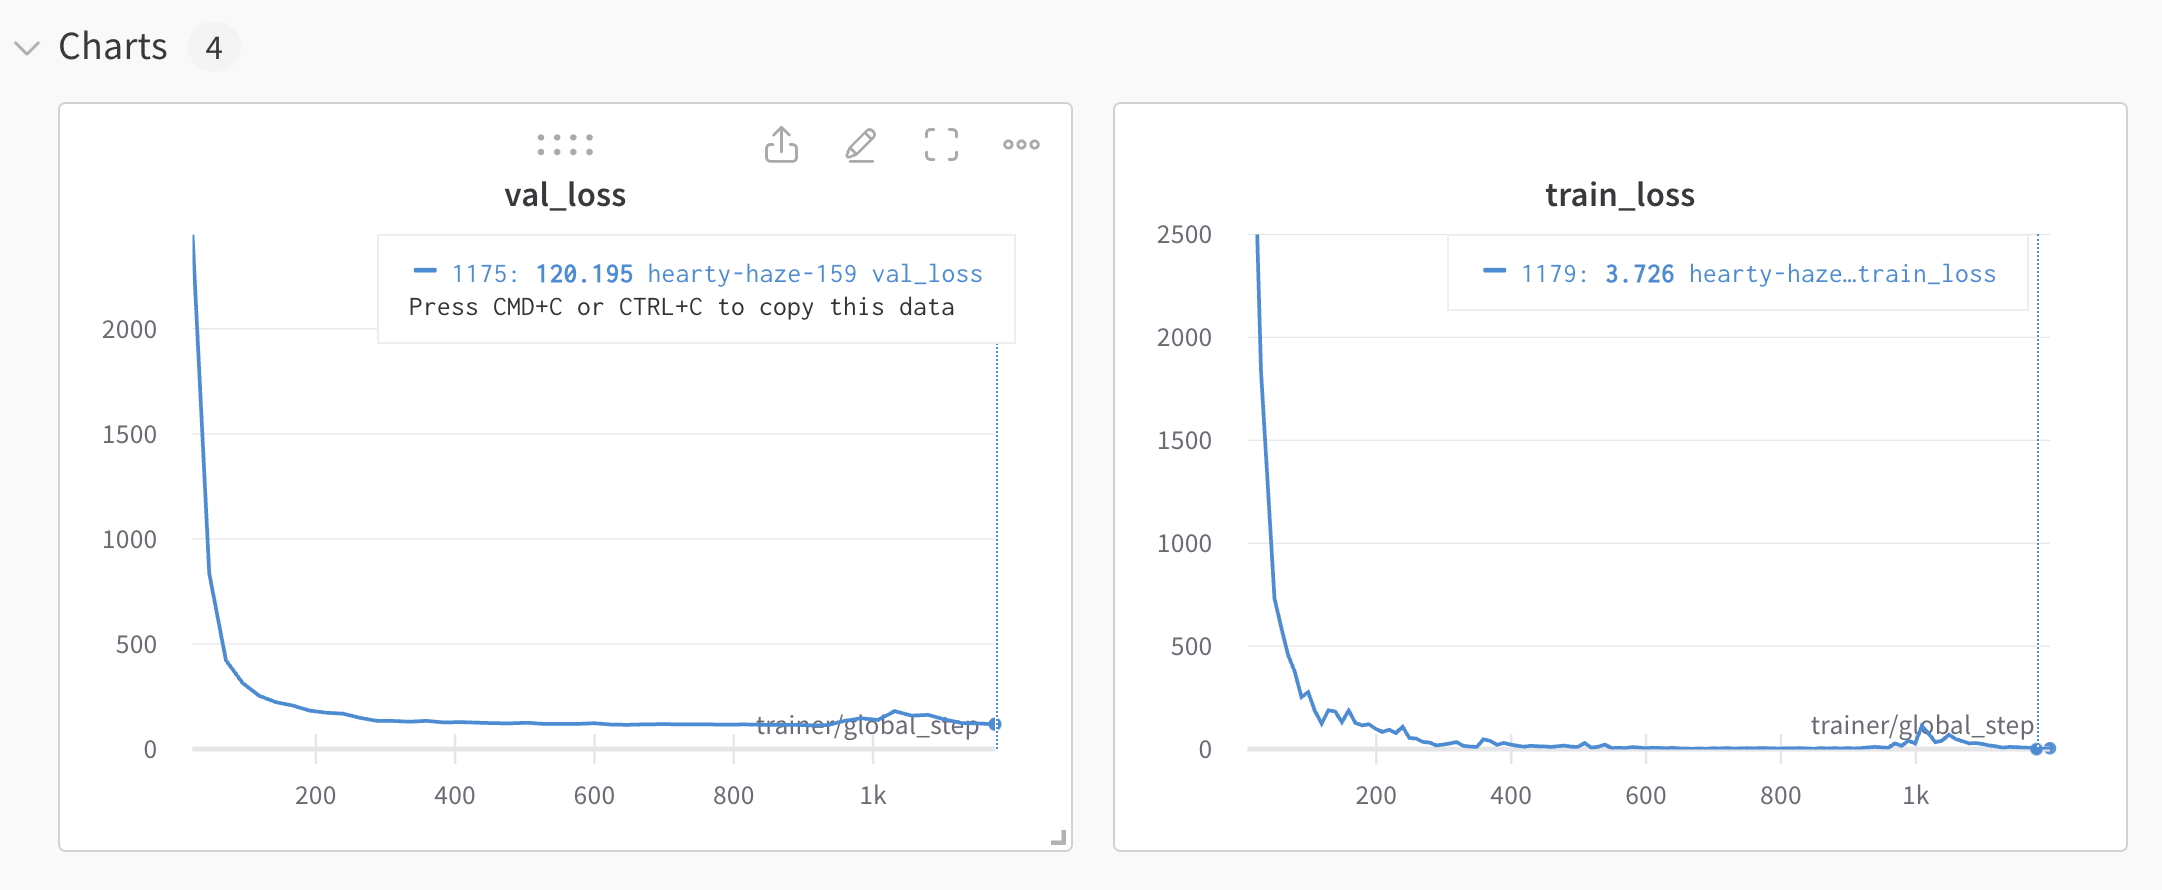
The additional data helped reduce the validation loss quite a bit, from 245 -> 120. This is likely due to the fact that the validation data is now much more "in distribution" for the model relative to the training set.
Regularization #2 - use smaller network
Let's switch to a smaller backbone network to try to reduce the overfitting: resnet18. This follows the suggestion of Andrej Karpathy in his Recipe for Training Neural Networks:
smaller model size. In many cases you can use domain knowledge constraints on the network to decrease its size. As an example, it used to be trendy to use Fully Connected layers at the top of backbones for ImageNet but these have since been replaced with simple average pooling, eliminating a ton of parameters in the process.
The code changes to switch to resnet18 are pretty minimal. Here is the updated LitVGG16(pl.LightningModule).__init__() method:
self.backbone = torch.hub.load(
    'pytorch/vision:v0.6.0',
    'resnet18',
    pretrained=use_pretrained
)

# Freeze the weights of all the CNN layers of the resnet50 network
if use_pretrained:
    for param in self.backbone.parameters():
        param.requires_grad = False

# Short-circuit the last fully-connected layer of the resnet50 network
self.backbone.fc = nn.Identity()

# Layer for predicting the XY coordinates
self.continuous_output = nn.Linear(512, num_out_features)

# Layer for predicting the keypoint visibility
self.kp_states = nn.Linear(512, 16 * 3)
While this seems to make a slight improvement on reducing the overfitting, it also introduces a large amount of underfitting. This model cannot achieve a very low training loss.
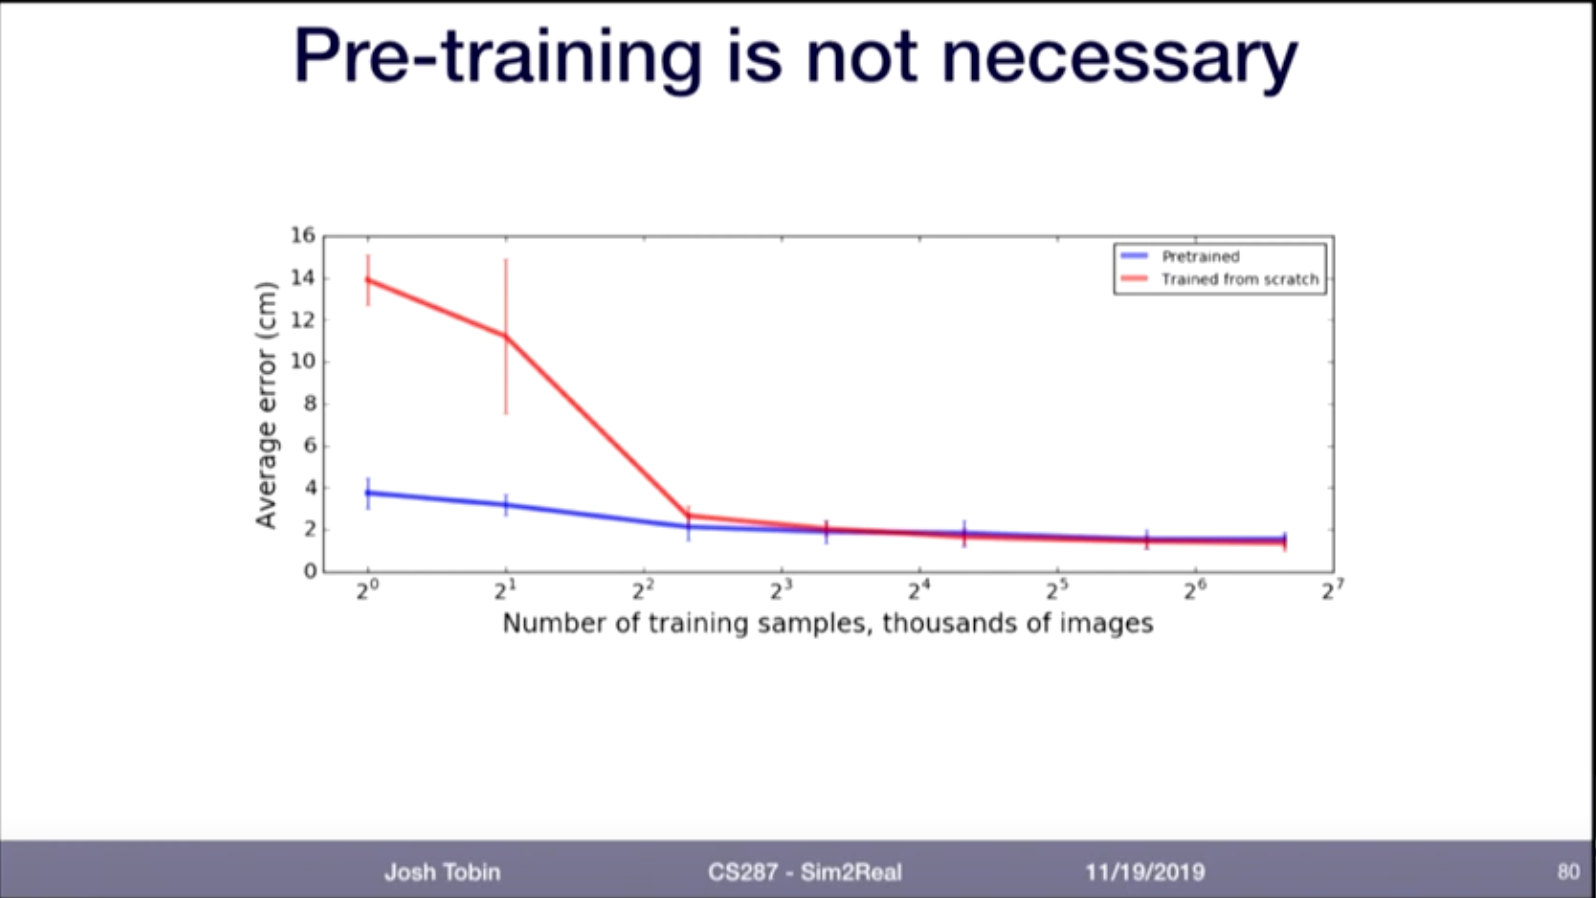
Switching from pretrained to training from scratch
To address the underfitting problem, let's switch from pretraining to training from scratch. This is also inline with this slide from Lecture 22 Sim2Real and Domain Randomization -- CS287-FA19 Advanced Robotics at UC Berkeley
This required two changes in the code:
- Set the pre-trained flag to false
- Remove the code that freezes the network backbone
- Remove the code that normalizes the images on imagenet values
self.backbone = torch.hub.load('pytorch/vision:v0.6.0', 'resnet18', pretrained=use_pretrained)

# Freeze the weights of all the CNN layers of the resnet network
if use_pretrained:
    for param in self.backbone.parameters():
        param.requires_grad = False
After updating the code to train from scratch, the under fitting is removed and the training loss is minimized to fit the training set. There is still overfitting however, which we can try to add additional regularizations to address.
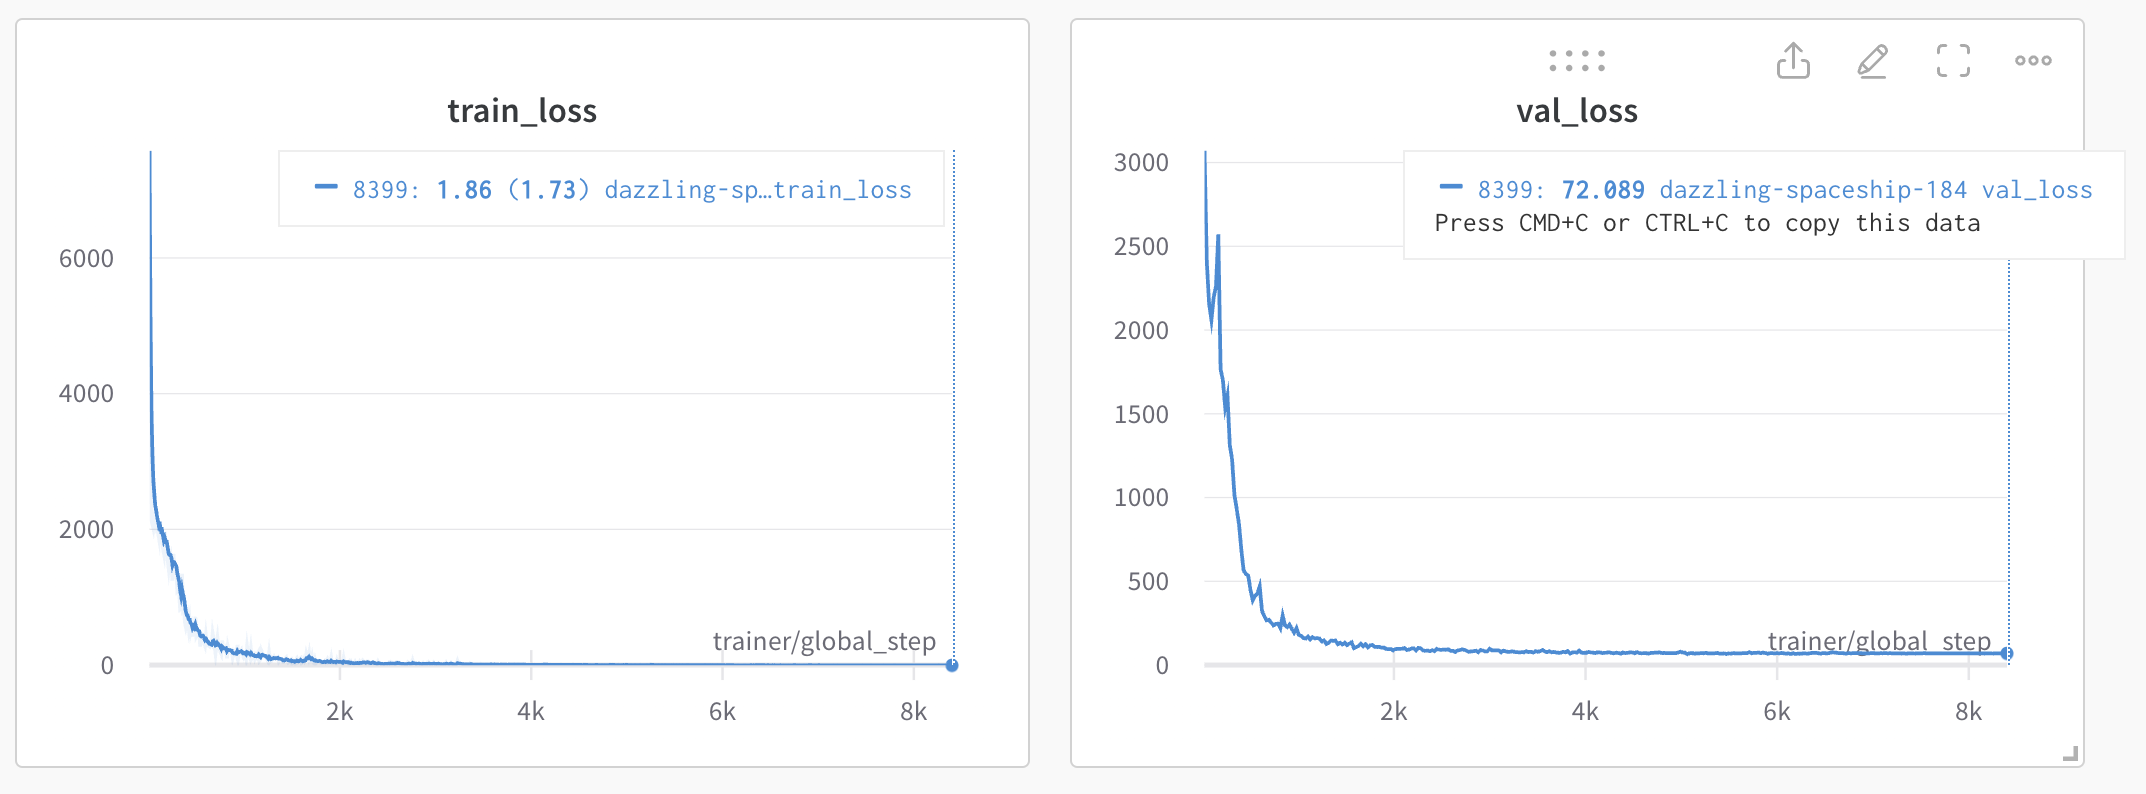
Regularization #3 - data augmentations
Adding augmentations was a bit tricky, because we only want the augmentations to be applied to the training set, not the validation set. Which means the following won't work:
dataset = TennisCourtDataset(
    data_paths=train_solo_dirs,
    transfoms=transforms.Compose([...])
)

train_dataset, val_dataset = train_test_split(dataset, test_size=0.2, random_state=42)
Because it would apply the transformations to both the training and validation sets.
To fix this, let's introduce a wrapper class that performs the transformations, while the TennisCourtDataset just returns the raw images. Then we pass the split datasets to the wrapper and only add the transformations to the training set wrapper.
Also since Albumentations (which is a good augmentations library) expects images in numpy arrays, let's use opencv instead of PIL to load the images.
Here's the updated TennisCourtDataset
class TennisCourtDataset(torch.utils.data.Dataset):

    def __getitem__(self, idx):

        ...

        # Load the image
        image_fq_path = os.path.join(data_path_root, capture_img_file_path)

        # Read an image with OpenCV
        image = cv2.imread(image_fq_path, cv2.IMREAD_UNCHANGED)

        # By default OpenCV uses BGR color space for color images,
        # so we need to convert the image to RGB color space.
        image = cv2.cvtColor(image, cv2.COLOR_BGR2RGB)

        # Get the image dimensions
        height, width, _ = image.shape

        # Check if the image has an alpha channel
        if image.shape[2] == 4:
            # Remove the alpha channel
            image = image[:, :, :3]

        # Resize the image to 224x224
        resized_image = cv2.resize(image, rescale_to)

        ...

        return resized_image, keypoints_tensor, keypoint_states_tensor
The dataset wrapper will then call the underlying TennisCourtDataset and apply the transformations.
class TennisCourtDatasetWrapper(torch.utils.data.Dataset):

    def __init__(self, dataset, transform=None):
        self.dataset = dataset
        self.transform = transform

    def __len__(self):
        return len(self.dataset)

    def __getitem__(self, idx):

        resized_image, keypoints_tensor, keypoint_states_tensor = self.dataset[idx]

        img_tensor_non_normalized = torchvision.transforms.ToTensor()(resized_image)

        # Apply any additional transformations
        if self.transform is not None:

            # Apply the Albumentations transformation to the image
            transformed = self.transform(image=resized_image)

            # Extract the transformed image
            transformed_image = transformed['image']

            # Convert the transformed image to a PyTorch tensor
            img_tensor = ToTensor()(transformed_image)

        else:

            img_tensor = torchvision.transforms.ToTensor()(resized_image)

        return img_tensor, img_tensor_non_normalized, keypoints_tensor, keypoint_states_tensor
As mentioned earlier, only the training set will have the augmentations applied, as shown here:
train_dataset, val_dataset = train_test_split(dataset, test_size=0.2, random_state=42)

transform = A.Compose([
    A.ChannelShuffle(),
    A.ColorJitter(),
    A.RandomBrightnessContrast(),
    A.RandomGamma(),
    A.GaussianBlur(),
    A.Cutout(),
])

train_dataset, val_dataset = train_test_split(dataset, test_size=0.2, random_state=42)

# Create training wrapper, with transformations
train_dataset_wrapped = TennisCourtDatasetWrapper(train_dataset, transform=transform)

# Create validation wrapper, without transformations
val_dataset_wrapped = TennisCourtDatasetWrapper(val_dataset, transform=A.Compose([]))

# Create the train and validation dataloaders
train_loader = utils.data.DataLoader(
    train_dataset_wrapped,
    batch_size=32,
    shuffle=True,
)
val_loader = utils.data.DataLoader(
    val_dataset_wrapped,
    batch_size=32,
    shuffle=True,
)
Notice in the list of augmentations we have to be very careful to not introduce anything that will change the geometry of the image, because otherwise the keypoint locations will be invalid! When we resized the image, we updated the keypoint coordinates to scale them to the resized image, however that would be much more difficult with image augmentations such as A.Rotate() and A.ElasticTransform()
Results - validation loss increased slightly
Adding the augmentations appears to have increased the both the training and validation loss slightly
Looking at a few validation results, some predictions are nearly perfect:
and others have minor errors:

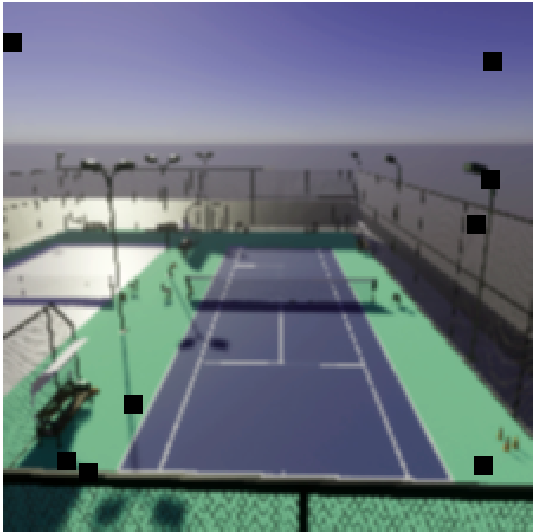
but a select few have egregious errors:
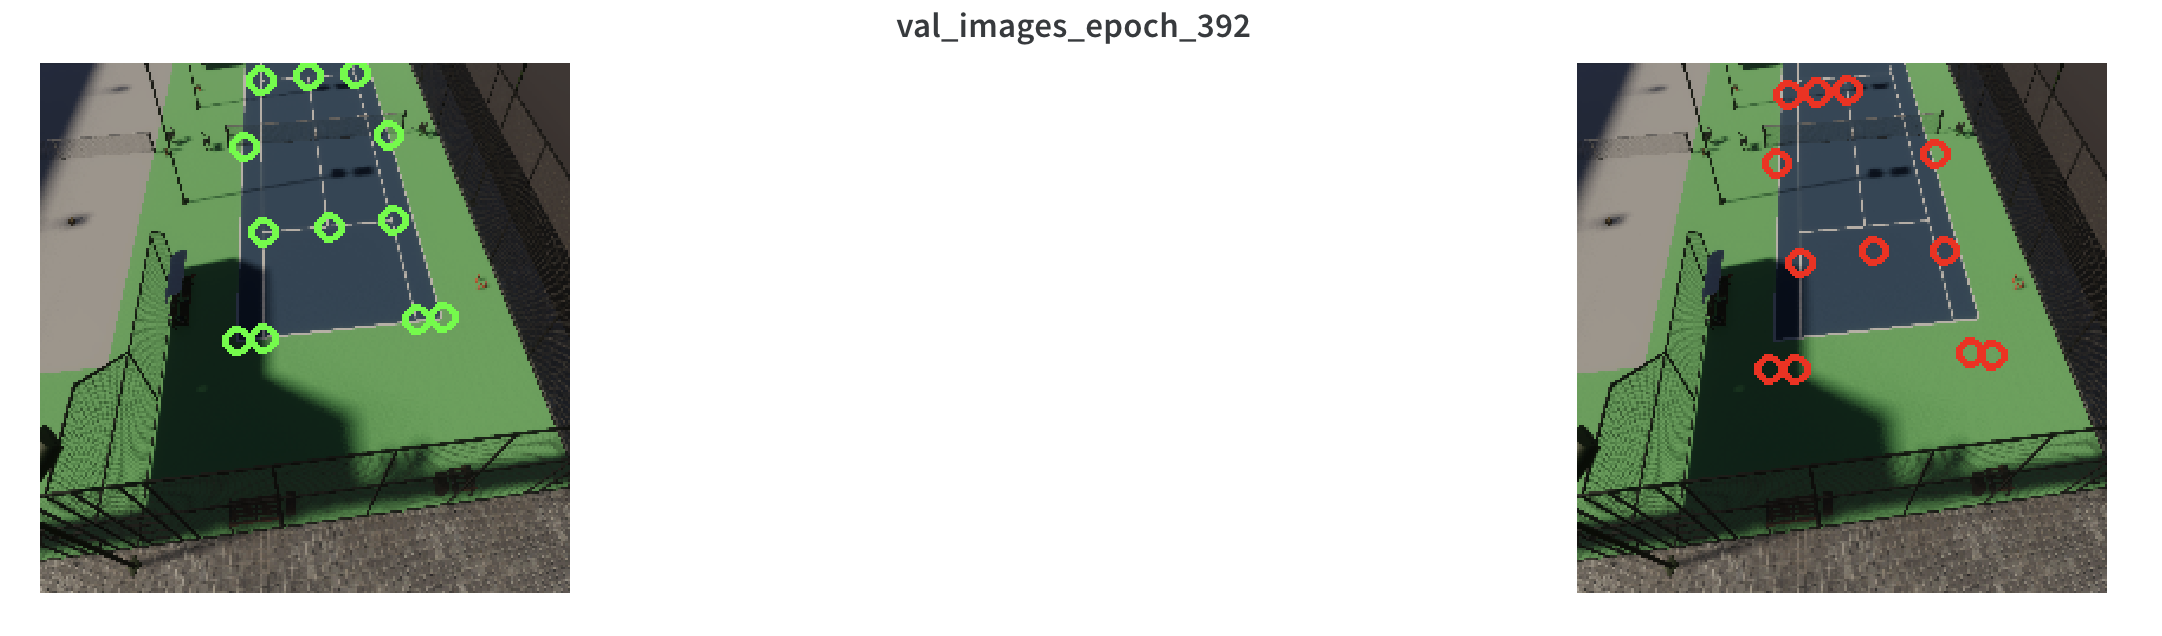
in this case the additional shadows might not have been well represented in the training data, putting these "out of distribution". It's a bit disappointing though, the model should been able to predict the points outside of the shadows. It probably indicates that the model is overfitting the training data and is not coming up with general enough features.
The training/validation set is still relatively small, with only approximately 1200 images. This might not be enough to train a model from scratch, and so it might be worth revisiting pre-trained models in order to improve accuracy.
Recap
In this part, we:
- Increased the size and variety of the dataset by adding another tennis court model
- Introduced a train/validation split of 80/20
- Switched to a smaller and newer model (Resnet18)
- Trained the network from scratch
- Added augmentations to the training set
In part 5, let's try to test the network on unseen data from a 3rd tennis court model.